February 21, 2012

Paraffin waxing a barrel.

So after adding dates to the small 5 gallon barrel, fermentation started again and I noticed the S-airlock burping.  The next day however it wasn't burping, but there was maintained pressure on the water in the S.  I was a bit confused at why that would be.

Now, the 5 gallon barrels I have were previously wine barrels (a plus) that had been sitting on display for 2 years (a minus).  Needless to say, they were not in the best of shape when I got them.  The barrels did swell tight, and after I steamed this barrel, I think it should be good to use.  However, given its past, I started wondering if the staves on the top of the barrel (where no beer is directly in contact with) might not be drying out and the joints separating just enough to let out some of the C02 produced during this fermentation.  (Note: there isn't really an issue with gases escaping now, however, if gas is allowed to enter through these same cracks later, we run the risk of acetobacter ruining the lambic)  So I decided to test this hypothesis:
Soaking the barrel's top staves from the outside.

Here I have a piece of wet cloth covering the top of the barrel.  In a few minutes the barrel started burping!  With my hypothesis proven, I kept the cloth on the top of the barrel, and kept it wet, for about 24 hours swelling these staves from the outside.

I know paraffin wax is commonly used on barrels.  When people don't want oxidation or the oak flavor to be imparted on the contents of a barrel, it is poured into the inside and allowed to coat the interior.  Obviously I don't want to seal the whole barrel as lambic greatly benefits from that slow oxidation oak provides.  I do, however, want to seal part of the barrel.  Now that I've re-hydrated the top staves so they are air tight again, I want to lock that in by paraffin waxing just these top staves.

Prepping the barrel before waxing it.
First I tape off a line at about 1/3 of the way down.  This is far enough down that the level of the beer inside should always be safely above.

Coating the top of the barrel with paraffin wax.
The next step is to coat the barrel with paraffin.  I melted a couple blocks in a metal tray and then simply scooped it on with a spoon.  This allowed me the control to make sure every bit of the target surface was covered with wax.  I could stop here, but its a bit ugly looking with a lot of unnecessary wax.

Melting off the excess wax.
To remove the excess, I took a blow torch and melted the wax from the top of the barrel down.
WARNING: If you are using a spirit barrel for the first time, do not do this until you have filled the barrel!

All of the excess wax has been melted off leaving a clean finish.
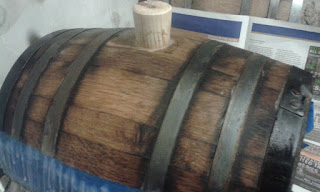
As you can see, this leaves a clean looking finished barrel.  Only a thin film coats the barrel, and that is all that is needed.

Finished barrel with wax only on the top third.
Finally I remove the tape and paper protected the rest of the barrel and you can see the final product!  The burping of the airlock has really picked up, even more than after just swelling. 


One complaint people have about using 5 gallon oak barrels is the higher surface area beer has to oak, and so the higher level of oxidation that occurs.  It makes me think that this might be a good thing to do even if your staves are air tight.  I'm not sure how to calculate it, but I'm sure one could figure out what percent of the outside of a 5 gallon barrel should be waxed so that it results in the same relative oxidation as a 60 gallon barrel.  I wouldn't be surprised if its the whole outside except for the heads!

Update (02/23): I added the dates (that provided the sugars for a new fermentation) 5 days ago.  Since waxing the top, the airlock has been burping about every 7 seconds.  Compare this to not burping, and then only burping about every minute after swelling the top.  While swelling the barrel from the outside certainly helped, there was still a considerable amount of gas allowed to escape through the stave joints.  I feel as though by doing this I have avoided serious problems down the line and hopefully saved the integrity of the lambic in this barrel.  Conclusion; I HIGHLY recommend doing this to your barrel if it had sat empty for any substantial amount of time.

Further Update

February 18, 2012

Barrel Notes: Day 22

I have checked in on the pellicle again as I am interested to see it during different stages of development.  Here is a picture of its current state.

Pellicle formation in the large barrel.

As compared to the picture in my previous post, it appears as if little colonies have developed.  The aroma coming from the barrel is increasingly funky.

You may remember that in addition to the 225 liter barrel, I had enough wort left to fill a small 5 gallon barrel.  To ferment the 5 gallon barrel, I used an assortment of commercial sour dregs collected at a beer tasting event.  It is interesting to compare the pellicle formed in the big barrel (above) to that of this 5 gallon barrel (below).
Pellicle formation in the small barrel.

There are a few major factors that cause such a different pellicle formation between the two barrels.  The primary factor would be the different yeast source.  Another factor is the 5 gallon barrel has higher oxidation due to greater surface area with the oak.  In addition, there was only about 4 gallons remaining to fill the 5 gallon barrel, so it is a relatively short fill resulting in a larger head space.  This head space has theoretically been filled with CO2 during the primary fermentation phase, however I do not doubt a certain amount of oxygen was present as well.

I don't want that much head space in the 5 gallon barrel during the aging process.  After some consideration on what to do, my plan for this 5 gallon barrel is to make the Sikaru I talked about earlier.  To do this, I will be adding dates and honey to the lambic.  The rule of thumb in fruiting lambic is 2lbs of fruit per gallon of lambic, so I will be requiring 8-10 pounds of dates.  Normally fruiting is done a few months prior to bottling, however, I will be adding a portion of the dates now to eliminate the unwanted head space in the barrel.

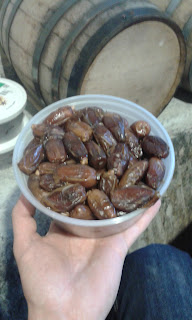
14.5 pounds of dates ready to add to the lambic barrelAdding dates to the 5 gallon lambic barrel

I purchased 4.5 pounds of whole dates.  I'm not 100% sure the reason behind using whole fruits, however I know Cantillon and others insist on it, and so I made sure to follow suit.

The view after adding the dates.

I wanted to wait until primary fermentation had ended to add the fruit, but make sure they were added before the aging stage started.  With the amount of sugar in dates, and the amount of dates I added, I wouldn't doubt if I saw a reasonably strong second fermentation.  I'm not worried that I've damaged the existing pellicle (and of a second fermentation damaging it further).  It was not dense enough to fall, and the disturbed area will grow back in short time.

February 13, 2012

Barrel Notes: Day 17

I can't help buy go down and smell the barrel every couple days (the aroma had been gradually declining since that Day 4 post).  It has been a few days since I have checked in on the barrel, and not expecting much I was surprised by the burst of new aroma.  Its still got a sour note, but now there is some funky aromas going.

I grabbed my flashlight to see how it looks, and to my delight, a thin pellicle has formed!

A thin pellicle has formed inside the barrel on top the lambic.

Those of you follow this blog know what a pellicle is, and know its a crucial part of the lambic brewing and aging process.  This is sooner than I expected the pellicle to form, but honestly I didn't know when to expect it.  I am going to declare the primary fermentation as complete and bung the barrel.

February 7, 2012

Lambic & Google Books (pre-1900)

A buddy just showed me Google Ngram which will keyword search all of the books Google has scanned in.  Its pretty amazing.  I searched "Lambic":
Google Ngram results for lambic

As you can see, the word is barely used pre-1900, but some of those old texts are very interesting!  The ones I've look at so far are mostly British brewers who traveled in and around Belgium for a period of time.  Much of their descriptions of lambic are completely wrong, at least according to how we understand lambic today.  It's interesting to read some of the pre-1900's scientific studies that were done on lambic.  It's also interesting to see accounts of other styles and their production methods.  I wonder if any of these other styles have since been forgotten?

Here is one pre-1900's text that you can't argue over.  A poem about lambic written in 1892:
I've only made it through the texts prior to 1900.  I'm curious what is in that boom in the mid 1910's, and then also in 1960.  We know the production an popularity of lambic was hit hard during WWII.  I wonder what was written about lambic during that time?  Let me know if you find any buried treasures!

February 6, 2012

Barrel Notes: Day 9

hydrometer reading ~1.018

While installing the sample port yesterday, I took a bit out to measure the gravity and see what it tastes like.  Its at about 1.018 (OG was 1.057).  Taste is as if you mixed a Wit with a Berliner Weisse.  Obviously its very very young, so I'm just checking to make sure there are no off flavors.  All is well!

Installing a sample port

A week of fermentation has gone on and I'd like to get a sample of the beer to take some measurements.  I could simply put a wine thief through the bung hole and take out a sample, however, I need to be thinking long term.  Eventually a pellicle will form on the top of this beer, and I won't want to disturb it.  The best way for me to do this is to install a sample port on the head of the barrel.

The best and easiest way to do this is to drill a small hole and plug it with a stainless steel nail.  Because its so cheap, easy, and effective, this method seems to be the industry standard.  If you are having any doubt, there is a thread on Probrewer with some brewers talking about this, and I remember seeing the guys out at Lost Abbey doing this.  

Its important to use a stainless steel nail as you don't want the nail to corrode while in the beer.  This is especially true when doing an acidic beer such as Lambic.  I was thinking a copper nail would be fine as well, but after reading a couple sites, it seems copper leaches at a high level when in an acidic environment...so I would suggest against using copper.

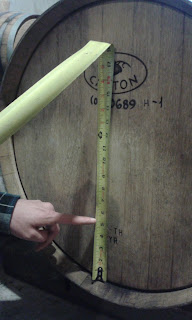
Measuring up the barrel about 5 inches.
There is no exact spot that is suppose to be drilled.  It should be high enough up so that you are above the trub, but low enough to ensure static pressure behind the hole.  I went up 5" from the bottom.

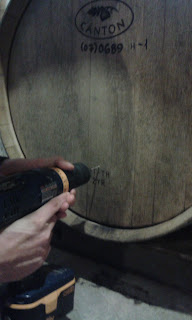
Drilling a small hole into the barrel.
The size of bit is also very important.  Too small, and the nail will slide out.  I used a 7/64" bit as recommended in the Probrewer thread. 

Wort coming out of the sample port.
 It comes out fast and shoots pretty far!  Make sure you have a container of some sort ready.

Stainless steel nail plugging the barrel's sample port.
And there is the final product.  The only stainless steel nail available at the hardware store was a 2 1/2" one. You could use smaller, but its kind of nice having a longer nail.

Google Analytics